Showing posts with label craft project. Show all posts

Thursday, December 13, 2012

hard candy Christmas...but not really


There's something about a jar full of found objects. I love jars of buttons, they're the best. I also love jars of bottle caps. When I was a kid (insert dinosaur joke), bottle caps were the currency of choice for our imaginary trips to the imaginary grocery store.

The collection above has been sitting on my shelf for about a year and the collection itself is about 2 years in the making. I wanted to make something Christmasy with them for my Junque Tree. Pickles was vehemently against this since she feels it means "ruining" the caps somehow.

Take heart, my dear Pickles! A a fun, non-altering solution is here. I've decided to make a candy wrapped garland with them. The idea is simple. I'm using cellophane to wrap the bottle caps like hard candy. All I need is:


*bottle caps
*scissors
*roll of clear cellophane - cut into 4 inch wide strips along the length of the roll.
*pipe cleaners (mine are gold!) - cut into 1 to 1.5 inch pieces


It's kinda tricky to capture, but here's the strip of cellophane. I placed two bottle caps together with the open sides facing each other and wrap them just like you would a hard candy disc. You know...
 
Dang cellophane!! The camera won't focus on it!  Ok, so twist the cellophane and tie it closed with your pipecleaner piece.  Same for the other side and there you have you first "candy".
 
Now, just add another and another tieing after each one. When you're coming to the end of a cellophane strip (about 4 or 5 inches left at the end) just start a new one and add it to your existing strand. Simply place the end of the new strand inside the end of the old strand. Then just continue on your merry way.

What you wind up with is a garland of bottle caps and they do look like candy!

 
They are too perfect for the Junque Tree!


signature avatar

Monday, December 10, 2012

that's just ducky!


Sometimes all you need is a little ribbon to totally change something. Look at these too-cute keychains I found at the "dollar store" (and .79 and 1.49 etc). These sparkly little quackers were .80 each and I had to have some! But I can't hang them like that. The keychain is convenient but ... no. Let's touch it up!


That'll do, Duck. That'll do.


signature avatar

Monday, November 26, 2012

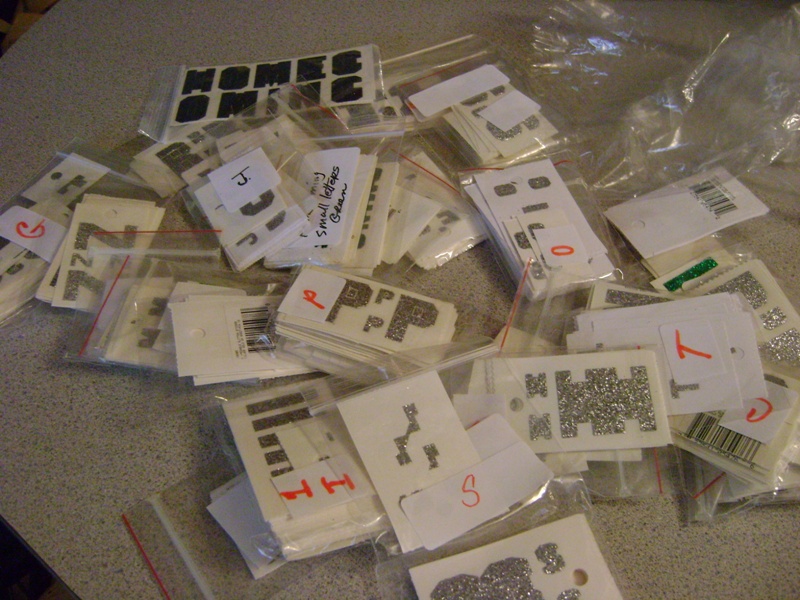
Thrift Store Score - homecoming edition

I know it's now officially Christmas season but look at my fun score from the thrift store....


HOMECOMING LETTERS! You know, the glittery ones you stick on homecoming mums. I found 2 bags of them for about $5 total. Do you know much fun homecoming letters can be? Just look at 'em!

 
Obviously, they'll make for some fancy Christmas gift tags with everybody getting tags with their initiasl on them. But some of these can be a little more silly.
 
 
Hello? Emoticons! amiright?
 
Of course, I could just use a mess of stickers to cover something and make it all shiny like. They'd make a fun crazy frame around a mirror. No telling, until I get started.
 
 
Bad picture but good intentions. These I's would make some cool stripes!
 
...and to all a good night!


signature avatar

Wednesday, November 21, 2012

Hey, Kool-Aid....nice box


Pickles is a sack-luncher and one thing that goes in her lunch every day is a Kool-Aid pouch. We wind up with several leftover boxes. Granted we recycle them, but I just like the shape of the box. Figured I could repurpose them, but I gotta pretty 'em up first.


With some dollar store wrapping paper and ModgePodge, they become a cute matching set. Good for storing crafts supplies, office supplies, maybe stuff in the kitchen cabinets.

I'm using these for storing some product for the shop. They're particularly cute when they're stacked.

Cute, cheap, easy....my favorite!


signature avatar

Monday, February 6, 2012

Get Ready to Swap!

So I got my valentines done and sent out for Aunt Peaches' Valentine Swap. The idea was to send handmade valentine cards to three recipients and you would get valentine cards from three senders. I hope my recipients like theirs as much as I liked making them. I decided on making mini garlands.

I used classic Valentine materials: paper, ribbon and some doilies. I cut scalloped hearts and punched holes on either side.

I then strung them together with red ribbon. I used doilies to cut more heart shapes which I then laid over the red hearts.

I then added some letters (stickers). A short Valentine poem is written on the back of each garland.

I couldn't have a cute little garland in a plain ol' envelope so I wanted to make heart shaped pockets. I cut heart shapes with zig-zag scissors and punched holes along the "sides" of the hearts. Then I stitched two hearts together with a button stitch (of course)! I put my valentines' names on the hearts. Here are the finished valentines:

Thanks to Aunt Peaches for putting on this swap!


signature avatar

Friday, August 26, 2011

Mama's gotta brand new bag!

...and Pickles too!
As you may know, I'm a member of the ladies auxiliary at Daddy's firehouse. The gals are sweet and we have a good time. I thought it would be a fun project to give each member a bag for auxiliary use that we could each decorate. I found good bags at cheaptotes.com

Since our logo includes Rosie the Riveter, I really wanted to do something with polka dots as Rosie wears a red and white polka dot kerchief in her hair. I decided on a polka dot initial with sparkly gems. Now, I've never done this sort of thing before so just know that I was totally winging it. What I do like is tips and suggestions on doing it better or easier. So if you have one or the other, please share!

My materials are:
my bag
red and white polka dot fabric
paper
iron on gem stones


The first thing I did was make my initial on paper. I pinned the paper to my fabric (a little tilted so it wasn't so symmetrical). Then with the zig zag setting on my sewing machine, I sewed the paper to my fabric. When I was done, I cut the paper out and had a nice initial with a clean neat edge.

I then added my iron-on gems to give my initial a fun sparkle! I gotta tell you , I have a whole new appreciation for folks who make gem studded goods. Oy, What tedious work! But I got them all placed right and then applied the iron. Now bejeweld,  I cut out my initial and used clear, nylon thread to sew onto my bag.
 Not so hard, right? That's it for now. Oooo, y'all wanna see it now, huh? Pics coming as the project progresses!!

signature avatar