Showing posts with label decor. Show all posts

Tuesday, December 11, 2012

hooked on colors

Holy Pinata, Batman! I love the colors on my tree, it's like Fiestas Patrias! But I couldn't hang my cute little decorations with those plain old aluminum hooks. How booooring. I needed something festive, bright, cheery. Oh if only I could find that special something...
But wait! What's that I spy? Over in the stationary supplies in the kitchen. Could it be? Yes! Paper clips.

Okay, that's not how it happened. I was cleaning the stationary cabinet and I ran across the paper clips. I remembered using them as hooks in the past but now...they'recolored!
Just open them up and voila! A cute, color coordinated hook for my scrap medallions.


signature avatar

Saturday, December 8, 2012

it's not junk, it's Junque


And then there's a little something for mom. I call it my Junque Tree. It sat in the attic
unused last year but I wanted to bring it down and let it show off. Plus, the family's tolerance for my quirky taste only goes so far so....

Since I didn't have ornaments ready for this little tree, I decided to raid the craft supplies and store items for cheery decorations.

These scrap medallions were a given.
 
And when I saw these ducks at the dollars store, I just couldn't resist!
 
The prize ribbons were a must, they're so colorful...and for sale :-)
 
Of course, a Christmas tree needs a garland. I added my ruffled two-tone streamers which just brings in a whole, mexican pinata feeling.
 
And these stars are a long-ago craft project for gift giving on a budget.
I found a few left in the attic and threw them on!
 
One of my favorite things on this tree is my hard candy bottle cap garland. Bottle caps strung in cellophane to form a fun addition to my tree.
 
My MOST favorite decoration is my heart from Pickles. It was a Valentine's gift but now...


signature avatar

Friday, December 7, 2012

holiday lights... and lights


My tree trimming is all done and I don't mind saying I love it!!  As I'm sure you do, I have my steps and methods for getting a tree that is full, bright and just right! I mentioned before, I stuff a couple of garlands into the center of my artificial tree to make it look fuller. When my tree is nice and fluffy, I start adding lights, extra lights, since our tree is pre-lit. LIGHTS LIGHTS LIGHTS!
 
Years ago Mother Darling taught me to brighten my tree with a most basic trick: put reflective, refractive ornaments on the inner branches. Doing this first bounces light around really making your tree sparkle! Use ornaments that are:
CLEAR FACETED
these are actually plastic ornaments but they're made to look like cut crystal. Think clear plastic stars or snowflakes too!

METALLIC
A classic, of course! So shiny, and that mirror finish means every
ornament adds several extra points of light!

DISCO BALLS
 Hello...if they're good enough for the skating rink slow jam, they're good enough for me. A ball covered with mirrors is perfect...amariteorwut?

THE LATEST
trick I just got from Aunt Peaches.

She uses little puffs made from tinsel to 'thicken' her tree. When I saw them, I knew I MUST use them for extra sparkle. Boy does it work! Placed in the inner branches, each puff becomes a little cloud of light!

Once my 'base' is down, I can add all the other layers of decorations on a shiny, sparkly canvas!


signature avatar

Monday, December 3, 2012

filler up!


I don't know...should a tree be this bald?


This is our christmas tree. Daddy McD prefers an artificial, pre-lit tree to a natural one. I could go either way as arguments for each are valid. However, THIS tree in particular has a certain something missing.


We'll call them branches...or sprigs, or tree. Yes, it's quite decidedly missing a certain amount of TREE. Look at it! you can see clean through every part!

There's still hope, though. A simple solution really. I stuff it with garland. Not the thin tinsel-y kind. the thick, wire-y kind that you hang on mantels or banisters. I stuff it into the empty spaces. It fills up the bald spaces and garland is super easy to score cheap at after Christmas sales or, my favorite store, the thrift store. Thrift store ones are best if you're using them for filler or some sort of background.

Here you can see the center pole right through the tree. a big empty space wating for some filler.
 

I just take a swag and wrap it around a level or two. Of course, once all the ornaments are on, it will look much fuller but the garland gives this tired old tree just a little more life.  Now, isn't that better?


signature avatar

Monday, October 29, 2012

O Mais Oui...Oui

This was a project weekend. A good one.  I don't deny it, it's been a long time coming. The kids' bathroom has been a dull, sad space for quite a while. I know; what kind of mother lets their kids poo in a boring bathroom, right? I believe Charmin said it best when they said "why not enjoy the go?". No more lame poo-ing in this house!
Pickles and I decided on a a black and white theme (which of course I was rooting for since the bathroom is already white...don't tell Pickles). She also said she wanted it a little bit frilly and she wanted it "french". (Mind you, two boys use this space as well, so let's not get too frilly or frenchy)

We scoured the webs for decor ideas (you can see the stuff we liked on this Pinterest board) and settled on some fun elements.  So here are some before pics:

What happened?!?! This all white bathroom actually used to be so cheery with a rainbow ribbon shower curtain, sunny yellow window curtain and a circular rainbow rug (not pictured). And what do we see there...THERE, in the corner of the window. Is th-...is that FLORIDA?
I promise, there are no bodily excretions on this wall. I don't know what it is, but I know what it's not. Let's move on. Next we see the view looking out toward the hallway
 
Yep, nothing to see here. Just plain white. Just the shower, the cabinet and the bathroom door. I can't really say why the cabinets and the door weren't painted plain white when the rest of the bathroom was...somethings will remain forever unknown. Like that Florida thing at the window.
 
More plain white (I think I'm typing that phrase by pure muscle memory now...plain white, plain white, plain white. yep.) I think the point has been made. So, ready? Here it is:
 
I loved the curtains I found on the web and decided to make my own. I bought two curtains for $13; one was $5 (for the window) and one was $8 (for the shower). I sewed on a black ribbon I got at a local supplier and voila!
Oh look at that lovely black trim breaking up all that PLAIN WHITE. And that baker's rack? I shopped that from another part of the house. It was the typical wire and wicker baker's rack. All it needed was a quick spritz with some black paint for the shelves.
 
I'm sure the neighbors loved looking at junk hanging from the porch as the paint dried.
Now, the same simple black broke up the opposite side of the bathroom...
 
 
The Eiffle Tower print was $5 at Ikea and the frame came from the attic.
 
Letters from the craft store were sprayed with black paint and we hung them up with ticky-tack (that's what Pickles calls it). It's that tacky, stretchy gum for posters and such.
 
Why, yes, the tile around the shower is black! No, I can't possibly afford to re-tile. I confess to having painted it. I call it my Franken-tile. 
 
I painted it with outdoor, all-weather Krylon paint. It's a Franken-tile because when you get up close (and we won't be doing that today) It's a bit messy and patched up. Safe to say....I learned a few lessons about painting shower tile, painting in the bathroom, SPRAY painting in the bathroom, proper preparation for a job like that. BUT it can be done and I'm pretty much happy with what resulted.
 
I love it, Pickles loves it, the boys well... they don't hate it. And they have a nice place for Oui Oui!

Friday, October 12, 2012

Thanks Pinterest! Bookshelf

It wasn't exactly hideous but I rearranged our living room bookshelf based on a cute pic I found on Pinterest. The books are lined up in a fabulous lil' reading rainbow.  From disheveled to delightful!


signature avatar

Wednesday, July 13, 2011

The Little Camper that Could

One of our favorite things to do with the kids is to get out the camper, get on the road and find a sweet spot to stay for a few days. RV resort or state park, no matter. We like the time we spend and enjoy taking off with the kids.

On our last trip, I decided it was time for a camper make-over. I knew I wanted to do a country/Texan theme and went in search of themes and ideas in the usual camper forums. Earlier this year I changed the flooring. I bought adhesive faux bois planks and boy what difference! From plain old linoleum to "hardwood floors" the change was really pretty. 
Then I found this pic
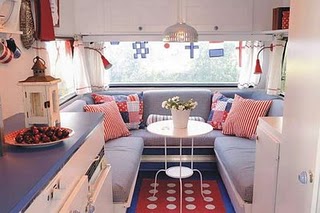
of  an adorable red-white-and-blue-camper over at Apple Blossom Dreams. I love it! Now, our camper is a pop-up so I can't change the "walls" because they are actually a vinyl canvas. However, the cabinets, benches and panels are good to go! I dragged Mr. McD down to Lowe's for some paint and painting supplies and got started right away.


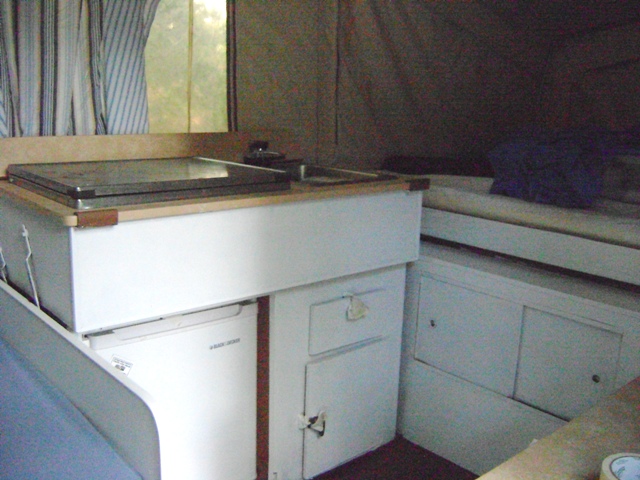
It took one weekend and one quart of white paint (well, primer with a bit of white paint stirred in). Here it is still in "raw" form; tape and paper and can, but I can already tell I love it. It does make the camper look a bit brighter and cheery!

In addition to a fresh coat of paint, the camper will get all new backrest cushion covers, seat covers, valances and curtains. Don't you love make-overs?!? The dining table seat cushion covers were easy-peasy! Instead of making full covers and fooling around with a zipper, buttons or some other fasteners, I went for a fitted sheet style cover. There were so many easy "fitted sheet tutorials" on google, I can't even remember which site I went with. But I can tell you it was simple! I used a blue fabric I'd been saving for the camper. It's a sort of faded-denim blue that goes great with my intended theme. Now comes a confession: like my mother before me, I'm a fabric hoarder. I used to scold her for having SO MUCH unused fabric, but now I do the same thing and can't help it! So many pretty colors, so many cool patterns; a project has to be just right for a particular fabric to warrant my cutting into it. But I digress.

These are the remaining two patterns and they're both vintage sheets.

Aren't they adorable? The red and white gingham for a bench seat cover, the pretty striped floral pattern for dining table backrest covers. But look again, do you see that price tag?

Yes, each sheet cost me $1.80 from my favorite store....the thrift store! Now for curtains & valances and we're almost done!

signature avatar