Monday, September 19, 2011

If buttons grew on trees...

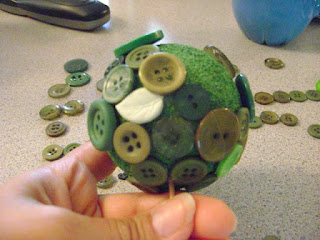
I've been dreaming of a scene with buttons. A scene where the sun is buttons and the clouds are buttons and the trees are buttons and the grass is buttons and...well you get it. It would be a little diorama maybe, because I like finding things to do and make with my buttons! So I decided to start with a tree. A simple, pretty little button tree.

The materials are basic.  (Of course) Buttons, a twig from outside, a styrofoam ball -and a half, green paint, hot glue, yarn, and a jar lid   Just trust. The first thing I did was paint the ball  green like so....

While that dried, I did the fun stuff; going through the buttons to pick out great green ones!

Then the gluing began. I left a space to stick the twig later. It's looking good already isn't it? So, I glue and glue til the ball is covered in fun green buttons.

So once it's covered, it's time to set it up on a base. No sense in having a layin' down tree, huh? Now comes the half styro ball, and the jar lid.
The tree will stand in the styro half and the stryo half will be weighted down by the jar lid. Otherwise, my little button tree will be top heay and topple over...repeatedly. When the tree was nestled into it's little spot, I got my yarn...my green yarn...my fuzzy-wuzzy green yarn that I bought without knowing when I'd ever use it.

I can't remember if I started at the bottom or at the top  but I wrapped the yarn all around the stryo and the jar lid. It was a bit tricky because as you can see it has those long, fine hairs, oy! But it was worth it! Look at that cute little button tree; it's so....button-y!! I will now give it a happy little home with my other fun stuff until I make it's companions for a button scene.


signature avatar

Thursday, September 1, 2011

Camper aux Fin

I did finally finish the camper curtains and cushion covers. I loved the way they turned out and the way the valances for them turn out! It's too cute and very country. My only problem is installation of a system to hang my valances. I do need something that can be removed when it's time to pack up and bring down the top. I know what you're thinking...velcro right? Well think again. Yeah, I know the adhesive backed velcro would be the ideal hanging device for my valances. But this is Texas, y'all. And this is summer in Texas. About three hours into our camping trip, the adhesive on the velcro is literally MELTING and the velcro strips slide right off any surface you stick them on. Before I go on, let's take a look at them:


This is the long bench with the red and white gingham fabric.

The dining benches have denim blue seats with red and white back rests (from the sweet vintage fabric).
It looks to fresh and sweet I just love it.

Here you'll see two different curtains and just know that there is a method to my madness. I'm considering puttting up a peg board between the kitchentte and the 'living' space. Different room, differnet curtains., right? Maybe. Haven't decided if I love it. I don't hate it though


signature avatar

Friday, August 26, 2011

Mama's gotta brand new bag!

...and Pickles too!
As you may know, I'm a member of the ladies auxiliary at Daddy's firehouse. The gals are sweet and we have a good time. I thought it would be a fun project to give each member a bag for auxiliary use that we could each decorate. I found good bags at cheaptotes.com

Since our logo includes Rosie the Riveter, I really wanted to do something with polka dots as Rosie wears a red and white polka dot kerchief in her hair. I decided on a polka dot initial with sparkly gems. Now, I've never done this sort of thing before so just know that I was totally winging it. What I do like is tips and suggestions on doing it better or easier. So if you have one or the other, please share!

My materials are:
my bag
red and white polka dot fabric
paper
iron on gem stones


The first thing I did was make my initial on paper. I pinned the paper to my fabric (a little tilted so it wasn't so symmetrical). Then with the zig zag setting on my sewing machine, I sewed the paper to my fabric. When I was done, I cut the paper out and had a nice initial with a clean neat edge.

I then added my iron-on gems to give my initial a fun sparkle! I gotta tell you , I have a whole new appreciation for folks who make gem studded goods. Oy, What tedious work! But I got them all placed right and then applied the iron. Now bejeweld,  I cut out my initial and used clear, nylon thread to sew onto my bag.
 Not so hard, right? That's it for now. Oooo, y'all wanna see it now, huh? Pics coming as the project progresses!!

signature avatar

Friday, August 19, 2011

WEST and wee-wax-sation

Well, I'm back from a week's vacation with the family! Our destination was the beautiful state of Arizona. I'm in love with it. The terrain is stunning, the history is rich and the climate is perfect! Now - I must confess, we did not take the little camper. Even though I did work on the make-over, we decided to do something different for this trip. We decided to wing it!

Our first stop was Tombstone Arizona, site of the infamous 'shootout at the OK corral'. Daddy McD was disappointed that he didn't stumble upon a ragged, dusty, forgotten ruin. It was a lively place with lots of shops and several activities.

There's a re-enactment that happens a couple of times a day at the actual site of the shoot out. There are the old buildings like the Birdcage Theater and the Saloon. There's a mini tour into the mine shafts. There are cafes to grab a bite in.  I made sure to get my picture with "Wyatt Earp"!

We spent the night in Tucson and moved on to the Sedona area.

But first, we headed to the 'ghost town' of Jerome...

....although it's not really a ghost town. It's populated by what seems to be a majority of artists. There were several galleries and many shops but take heart, there are preserved sites of the old Jerome left. We did, however, make a fun find when the kids insisted on getting out of the van to explore an adorable brook by the road. As I was aiming my camera to get their picture, I realized we were in front of a half buried "gangster car" as Daddy and Elvis McD like to call them.

 It was quite a fun surprise!

If you've never seen Sedona or the area, you are missing out on some of the most beautiful land on God's green earth....except it's red!

We took the kids to the aptly named Slide Rock State Park. The main attraction there (aside from the towering red rocks, of course) is Oak Creek which, with a smooth and slippery limestone bottom, makes for a great, natural water slide! I warn you of two things: the water is FREEZING and the creek bottom is truly slippery. I don't advise walking in the creek. Sit by the edge and scoot or crawl about. Your body will thank you for it.

It was so fun that even Daddy McD had to get in for a slide or two down the creek!

After our cool dip and slippery sliding, we headed to Monument Valley in the Navajo Nation. Majestic is the word that continues to cross my mind. The formations are awe-inspiring and well worth the drive!

Entrance into the Navajo National Park was surprisingly inexpensive. What was even more surprising was the lack of U.S. citizens. We saw German, Japanese, French, Italian and other peoples but hardly any folks appreciating the treasure in their own backyard. The picture here doesn't come near to showing the awesomeness of these natural monuments. A fun stop was a post manned by Navajos near Tuba City to show off some dino tracks. I didn't figure on being as delighted as I was to see them but it really was cool!
There was even a big ol' T-Rex track and it was awesome!


The next morning we headed down the road to some stops on the Mother Road; Route 66. We drove past Twin Arrows, which is now protected by cement barricades. We made an emergency restroom stop at the historic Jack Rabbit trading post ("Here it is!"). We stopped overnight in Holbrook AZ. Although it was booked solid, we walked over the the Pow Wow Motel to take pictures of the famous wigwams.

There are several vintage cars parked around the motel for effect. I think it's great to see the famous stops that we can see in the movies; particularly in the movie Cars. And The Pow-Wow plays it up with the various cars they display in the lot. There's a tow truck, a Hudson and several more!

Further down the road we found Tucumcari., while not quite as as 'alive' as Holbrook,  folks there are trying to give this old 66 town a revival. Several of the motels are in operation and there are a couple of places that light up their neon in the evening! As we drove through New Mexico and got closer to Texas, we looked for a few 66 ghost towns. What we found though, is that most of Route 66 is a gravel road now. But we did come across Glenrio.

It's a town that once straddled New Mexico and Texas with a half of the town in each state. While it's fun to find towns still on the map, there's something bittersweet about finding the ruins of an old time burg.

We ran into some other 66ers who were making the trek from California to Illinois following the Old Road. They kindly took our picture at the old Post Office before we parted ways.

But that wasn't our last Route 66 stop! We just HAD  to stop at the Cadillac Ranch outside of Amarillo.

Another landmark of Americana, we once again crossed travelers from very far away. Sadly, most visitors paint and just dump their spray cans there at the site. Chief McD and I have vowed to bring a couple of lawn bags with us next time...believe me there will be a next time.

We stopped at Palo Duro Canyon because it's a favorite of the kids. It's the second largest canyon in the nation next to, you guessed it, the Grand Canyon.


We let the kids do some climbing around as the rocks are so big and so fun. Narually, Pickles McD asked to get a Junior Ranger badge and Elvis followed suit.


Another cool stop was a 'stations of the cross' roadside attraction. Built by a grateful businessman, it displays full sized scenes of the 12 stations of the cross up to the crucifixion and including an empty tomb.

It's really neat, and serves as a nice stop for refelction. We saw a trucker or two there. It made for a nice end to our day before the night-long drive home.

It was a week jam-packed with kitsch, lots of history and miles of gorgeous scenery.Thinking of running away now!

signature avatar

Thursday, July 28, 2011

Button, Button

So I think you can tell why my nickname is Buttons...I love them! Old ones, new ones, shiny ones, faded ones, simple one, ornate ones. In a forum I can't recall at the moment, another button-phile posed the question about what to do with all those buttons. Any self respecting button lover will have a jar or two or ten of wonderful buttons. But let me share a fun way to show off a few of your lovelies.


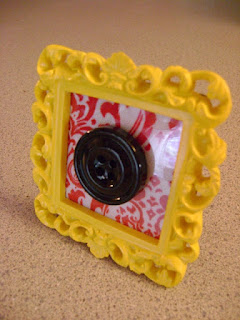
Frame 'em! How fun and special my favorite buttons look when shown off in a pretty and petite frame.
First, I picked some frames.

I got these in the dollar section at Michael's. Craft store, dollar store, yard sale even the thrift store are all good places to find small, decorative frames.

Next I dove into my stash of fabric remnants. Those little scraps that are too big for stuffing but too small to make anything. Choose your fabric to go well with your button. You don't want your button getting lost in your fabric pattern.

I cut the fabric to the size of the frame insert and put it in the frame. Then, using a good double-sided tape, I stick the button to the front of the frame.

That's it! I get such a fun way to show off those fantastic buttons. I can change them out regularly if I wanted to. it makes a neat little vingette for some extra wall space.


it's just one way to have fun with your collection. I'd love to hear from other button-philes about their display ideas. They're so fun, how can you not?
signature avatar

Monday, July 25, 2011

Measure Twice!...The Little Camper part II

Well, we all know the old saying; measure twice, cut once. What happens if you don't even measure once? You wind up with a sad face.

I know this because I wore one when I realized I had an awesome fabric find that I couldn't use. BOO! So "what had happen wuz", I went into my attic to find more fun fabric to use in my camper makeover. What I found was this adorable, single Waverly curtain  panel (from the thrift store of course).

I was stoked to finally use it and that it originally cost me 1.90! Now, imagine my excitement when I went to thr thrift store found a set of three panels of the SAME pattern for $5.00!!

Too good to be true, right? Right. You see, the fabric is sweet and the buys were a steal but, alas, they are TOO SHORT for my intended windows!!! I got so swept away by the find that I didn't even notice they wouldn't fit. Now don't get me wrong, I'll still find good use for this pretty pattern....but it won't be for camper curtains.

signature avatar

Wednesday, July 13, 2011

The Little Camper that Could

One of our favorite things to do with the kids is to get out the camper, get on the road and find a sweet spot to stay for a few days. RV resort or state park, no matter. We like the time we spend and enjoy taking off with the kids.

On our last trip, I decided it was time for a camper make-over. I knew I wanted to do a country/Texan theme and went in search of themes and ideas in the usual camper forums. Earlier this year I changed the flooring. I bought adhesive faux bois planks and boy what difference! From plain old linoleum to "hardwood floors" the change was really pretty. 
Then I found this pic
of  an adorable red-white-and-blue-camper over at Apple Blossom Dreams. I love it! Now, our camper is a pop-up so I can't change the "walls" because they are actually a vinyl canvas. However, the cabinets, benches and panels are good to go! I dragged Mr. McD down to Lowe's for some paint and painting supplies and got started right away.


It took one weekend and one quart of white paint (well, primer with a bit of white paint stirred in). Here it is still in "raw" form; tape and paper and can, but I can already tell I love it. It does make the camper look a bit brighter and cheery!

In addition to a fresh coat of paint, the camper will get all new backrest cushion covers, seat covers, valances and curtains. Don't you love make-overs?!? The dining table seat cushion covers were easy-peasy! Instead of making full covers and fooling around with a zipper, buttons or some other fasteners, I went for a fitted sheet style cover. There were so many easy "fitted sheet tutorials" on google, I can't even remember which site I went with. But I can tell you it was simple! I used a blue fabric I'd been saving for the camper. It's a sort of faded-denim blue that goes great with my intended theme. Now comes a confession: like my mother before me, I'm a fabric hoarder. I used to scold her for having SO MUCH unused fabric, but now I do the same thing and can't help it! So many pretty colors, so many cool patterns; a project has to be just right for a particular fabric to warrant my cutting into it. But I digress.

These are the remaining two patterns and they're both vintage sheets.

Aren't they adorable? The red and white gingham for a bench seat cover, the pretty striped floral pattern for dining table backrest covers. But look again, do you see that price tag?

Yes, each sheet cost me $1.80 from my favorite store....the thrift store! Now for curtains & valances and we're almost done!

signature avatar